Showing posts with label technique. Show all posts

Saturday, May 30, 2009

Hawaii Island Snorkeling Tips Part VI: Wilderness Beaches of the Big Island!

Part I of this series discuses Snorkeling Gear; Part II of this series covers Snorkeling Technique; Part III covers Snorkeling Etiquette; Part IV discusses Snorkeling Safety and Part V covers Big Island Snorkel Spots.

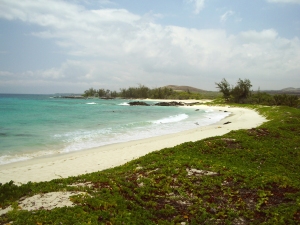
Waialea Beach in Kohala is the gateway to many small, secluded secret beaches on the Big Island...but why go any farther than this?  It's perfect! Photo by Donnie MacGowan
Waialea Beach in Kohala is the gateway to many small, secluded secret beaches on the Big Island...but why go any farther than this? It's perfect! Photo by Donnie MacGowan

Of all the Hawaiian Islands, because it is the youngest, the Big Island has the fewest and smallest beaches…this leads to crowding during the height of tourist season at some beaches. Because Hawaii is still rural, there are still some wilderness (hike-to-only) beaches; a few of them are among the best on the island.

Many wild beaches may be camped upon but you must apply for a permit from the appropriate agency. Overnight camping on Hawaii beaches is simplified because of the mild climate--usually I take a few quarts of water, a couple sandwiches, my camera, dry clothes for post-snorkeling comfort, a fleece blanket and rice mat to sleep on (a beach towel will suffice) and a small tarp on the off-chance it rains. The key here is that if the weather turns truly ugly, you are rarely more than an hour from your car. You may wish to bring a few extra quarts of water to rinse the salt off after swimming—it’s difficult to sleep comfortably with salty skin.

Two things to bear in mind—although is sometimes doesn’t seem it, Hawaii DOES have tides…camp well back of the beach area. Secondly, beach fires are not only illegal, they are hugely dangerous on most beaches on the west side.

Ke-awa-iki Beach (park off Highway 19 just north of Mile 79; walk along gravel road towards the ocean to a fence and foot trail; about 15 minutes to beach): A little walking over a lava road and a’a rewards you with a beautiful beach many locals don’t know about. This tiny black-sand beach has good snorkeling on the south side, where there is still a pocket of white sand. This unique black and white sand beach was created after the 1859 eruption of Mauna Loa, when lava reached the north end of the beach, where the black sand is today. Further south along the beach, the recent black sand has not had time to thoroughly mix with the pre-existing white sand.

If one continues south there are numerous tide pools to explore.

Hiking north, one comes to Pueo Bay, where freshwater springs make the snorkeling interesting but weird, with large temperature and salinity gradients. If one takes the trail heading inland towards a conspicuous growth of hala trees, one comes to a pair of lovely golden pools. A golden algae gives these pools their distinctive color, but be sure not to damage the growth by walking on it. Finish the trek by hiking back across the a’a…approximately 4 miles, round trip.

Photo by Donald MacGowan
Makalawena Beach on the Big Island is the epitome of Hawaiian white sand beaches...and it's always uncrowded: Photo by Donald MacGowan

Makalawena Beach (turn off Highway 19 south of Mile 90 at Kekahakai State Park; at the end of the road, take obvious trail north over lava field; the trail traverses rough lava and keawe breaks, so shoes are required): Makalawena is the finest swimming and snorkeling beach on the island and the most beautiful beach setting. This beach sports a series of coves, refreshing shade, big sand dunes and a nice freshwater pond to rinse-off in. A great backpacking getaway, a one-way through hike along the Ala Ali'i trail from Kekahakai State Park, past Makalawena to Kual Bay is a fabulous trip. Do not forget your camera; this hike will be a major highlight of your trip to the Big Island.

The land fronting the beach is owned by Bishop Estate and is slated to be turned into a development of condos and resorts; vigilance and protest on the part of locals and visitors is the only way we can keep this last, wild Kona beach wild.

Pawai Bay (in Kailua Kona, drive to the end of the Old Airport County Beach Park; hike along the ocean to the first, obvious, sandy bay): Spectacular, secluded, secret; Pawai Bay is perhaps the most interesting snorkeling spot on the island. Walk along the sea cliffs and coves about 15-20 minutes north, to the Queen Liliuokalani Children’s Camp at Pawai Bay. Remember, non-Hawaiians are restricted to travel along the tidal zone and only the edge of the shoreline…to venture even a few feet inland is trespassing. The ever-watchful security guards will remind you of this. Repeatedly.

Pawai Bay hosts a choice sandy beach with a small channel leading to open ocean and exciting snorkeling. Many charter snorkel tours bring clients here, but you can visit free by making the short hike in. Submerged caverns, arches and caves are filled with fish and coral and pristine water. From the shore, this is not a snorkel adventure for rank beginners.

Swim through the sandy bay to the channel and out to the cliffs. Be wary of surginess and don’t go in when the surf is big. Once in the larger bay, look back toward shore where numerous small channels lead shoreward but dead-end in cliffs; your passage back is the only channel through which you can see sand at the end. Remember this when trying to get back into the little bay.

The bay itself lies on Queen Liliuokalani Trust lands. Non-native Hawai’ians are not allowed on the land or to use the facilities. State beach access laws allow you to visit as long as you stay immediately along the shoreline; the beach is patrolled 24/7.

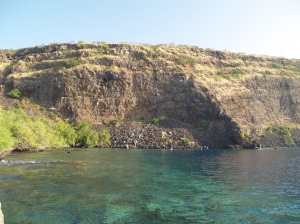
Kealakekua Bay from the Captain Cook Monument. Simply the finest snorkeling.  Ever.  Photo by Donald MacGowan
Kealakekua Bay from the Captain Cook Monument. Simply the finest snorkeling. Ever. Photo by Donald MacGowan

Captain Cook Monument (The trail leaves the Napo’opo’o Road right at telephone pole number 4, just 500 feet below where it drops off Highway 11; parking is tight, but safe): This hike is a fine walk through tall grass, open lava fields and dryland forest, opening onto one of the most pristine ocean beaches in the world. Hiking down to the Monument is great fun—the return is hot, thirsty and strenuous but rewards you with panoramic views of the coast. The 2.5-mile hike takes about an hour down, somewhat more to return. The trail runs straight down the left side of a rock wall toward the sea. As the pitch straightens out, keep to the left at the fork and proceed to the beach through the abandoned village. You strike shore several hundred feet northwest of the monument—remember to bear right at the trail junction when returning, or you face a long and unpleasant time wandering the a’a fields.

Snorkeling at the monument is wild and scenic, from shallow tidepools north of the wharf to the steep drop-off under the cliffs. There is a concrete marker in the tidal zone denoting the exact spot Cook fell somewhat north of the actual monument.

Honomalino Beach (turn off Highway 11 just south of mile marker 89, drive through Miloli’i; start hiking between the county park and a yellow church. Keep along the right at forks in the trail, in and out of the surf line, to avoid private property): A true gem of West Hawai’i and rarely crowded, Honomalino Bay is reached by a 20 minute hike from the south end of Miloli’i Beach County Park. Snorkeling is very interesting on the north side in the rocks, when the surf is low. The water, though very clear, is sometimes quite cold due to spring discharge in the sand on the beach.

Photo by Donnie MacGowan
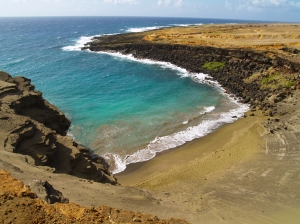
Mahana Green Sand Beach at South point on the Big Island: Photo by Donnie MacGowan

Mahana Green Sand Beach (Turn off Highway 11 to South Point, follow signs to Mahana Boat Launch. Park just above the boat ramp for the 2 1/4 mile hike to the Green Sand Beach): Absolutely unique to Hawai’i, beautiful and strange, are the green sand. The green sand beach at South Point is the best known, largest and most accessible of these. The sand grains here are olivine crystals, washed out of a cinder cone that has been partially breached by the sea.

When you reach the end of the trail, you are a hundred or so feet above the beach on the rim of the remnant of the crater. At the start, there is a tricky spot edging over a 3-foot ledge, but below this the trail is wide and clear One can also easily scramble down middle of the cone, but this can be slippery. Although tricky to spot on the way down, from the beach looking up the way back to the crater rim is easy to follow.

The beach lies in the interior of the cone, and the protected cove makes for a wonderful swimming/snorkeling spot but be wary of currents. Do not go out far, nor in at all in high surf or strong winds. The bizarre color of the water shrieks for color photographs, particularly underwater photographs taken while snorkeling.

A video covering many of these topics is available here.

For more information about visiting and touring Hawaii in general, and exploring the fabulous snorkeling on the Big Island in particular, please visit http://www.tourguidehawaii.com and www.lovingthebigisland.wordpress.com. For information about the author, go here.

All media copyright 2009 by Donald B. MacGowan

Monday, May 18, 2009

Hawaii Island Snorkeling Tips, Part II: Technique

By Donald B. MacGowan

Photo by Donnie MacGowan
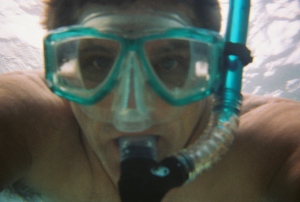
Donnie MacGowan Snorkeling at Kahalu'u Beach on the Big Island of Hawaii: Photo by Donnie MacGowan

Coming to my island for a vacation? There are three things I always recommend the first-time visitor do. First, get in the air. Secondly--go to a luau. Finally, I advise people of every age to get in the water and go snorkeling. The "one-one-one, experiencing the world through the fishes' eyes" magic of swimming in those bath-warm lagoons surrounded by clouds of tropical fish is an amazing, restful and restorative pursuit-you will find your mind going back to that experience over and over through the years much more so than many of your other travel experiences.

Part I of this series discuses Snorkeling Gear; Part II of this series will discuss Snorkeling Technique and Part III covers Snorkeling Etiquette; Part IV of the series covers Snorkeling Safety. Part V will cover Big Island Snorkel Spots and Part IV covers wilderness snorkeling.

Part II: Let's talk about technique: how are we going to do this?

Before getting into the water, where is your partner? Never snorkel alone; never get more than 20 feet from your partner. Memorize the color of your partner's mask and snorkel…this is how you will recognize him from a distance in the water.

Photo By Donnie MacGowan
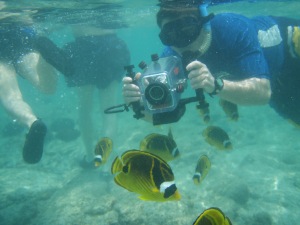
Bart Hunt Filming Fish at Kahalu'u Beach: Photo By Donnie MacGowan

Also before getting wet, you should make sure your mask is clean and that you have applied some form of defogger to it, either the commercially available solution (DO NOT get this stuff in your eyes!) or by simply rubbing some spit over the insides of the lenses. Pull the mask on your head, leaving it perched up on your hair as you enter the water. You should enter the water on a sandy patch of beach that does not drop off too steeply and is not in an area attacked by large waves.

Do not put your fins on before you are in the water. After wading out until the water is between knee and waist deep, face the incoming waves, sit down (this will also help you adjust to the temperature of the water--sometimes a bit of a shock but soon you get used to it) and pull your fins on. Remember: never turn your back on the ocean.

From this position, duck your head under and get your hair and face wet (to help the mask seal). Now stand up and pull the mask down, arranging hair, strap and snorkel mouthpiece to maximize the seal integrity and personal comfort. This may take some adjusting to get all the hair out from under the seal, to get the snorkel mouthpiece in the right position and get comfortable. Don't worry if there is a little fog on the mask at this point. Be sure the strap from the mask rises up over the ball of your head, not over your ears.

When the mask is sealed and you feel ready, bend at the knees, stretch arms forward and lean forward slowly until you are floating. Kick rhythmically, steadily, but at a pace you can keep up for some time. See? IT'S FUN! Oh, wait--don't forget to breath! Seriously, some people may feel a little claustrophobia at first with the mask and snorkel, and in chilly water it's natural to have short, gaspy breathing by instinct. Relax, concentrate on taking slow, even breaths. Snorkeling is relaxing, to be sure, but you have to be relaxed to snorkel. Breathe. Smoothly, rhythmically. Breathe.

Many people find they breathe and move more efficiently with their hands clasped behind their backs. Use your hands in sweeping motions to turn, or back up or fend-off too-near snorkelers, then clasp them back behind you again for cruising. Again, breathe. Smoothly, rhythmically.

If at any point you feel uncomfortable, simply stop, tread water (or stand up in the shallows), and put your mask up on top of your head. Look around you. See? It's easy! But never, ever remove your mask all the way while in the water--you could drop it or it could be taken by a wave and then you'd be having significantly less fun, really quickly. If there is fog in your mask, pull your mask away from your face just a fraction of an inch and just for a moment while under water to allow just a little bit of water in. Pull your head out of the water, allow the water in the mask to rinse away the fog, then tilt the mask away from your face just a moment again to drain the water out. Practice this in a place you feel comfortable. When you get good, you can do this without even stopping--this technique also allows you to clear your mask of leakage (and all masks leak a little) while on the go.

What's that gurgling noise? Occasionally, especially if the surf is up or you are diving, water gets trapped in the snorkel. You can purge the snorkel simply by exhaling strongly through it and blowing the water out the top, or more easily by lifting your head above water, spitting out the mouth piece and allowing it to dangle in the air and drain clear. Cake.

Poke your head out of the water frequently to check that your partner is within 20 feet of you and to keep yourself oriented relative to your entry and exit places. Stay alert--it's easy to loose track of time, get carried farther than you thought by a current you didn't even notice, wander out of your comfort zone, lazily paddle away from your partner, accidentally stray into a dangerous zone. So stay focused, stay oriented, always know where you are, where your partner is.

Photo by Donald MacGowan
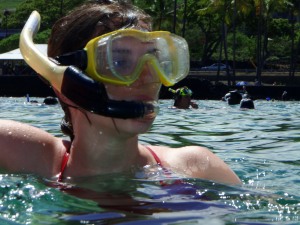
Amanda Maus Snorkeling at Kahalu'u Beach: Photo by Donald MacGowan

Gosh, what's that down there on the bottom? Diving is what snorkeling is all about. Do not expect to go deeply; do not expect to stay down long; err on the side of safety, be conservative in your actions. The ocean is composed of stacked layers of water, frequently of surprisingly different temperatures and salinities, sometimes distressingly moving in different directions. It is entirely possible to be swimming in quiet water, dive a half dozen feet under the surface and find yourself caught by a current you didn't even know existed…don't fight it, but turn and kick to the surface immediately so you can evaluate this new wrinkle while catching your breath.

To dive efficiently, start off by floating flat, face down, on the water. Fill your lungs and empty them completely a few times to charge your blood with oxygen. One more big breath in, then let half out (a lung-full of air will make you floaty and keep you from diving very deeply); with your arms forward, pointing down at your target, bend at the waist, kick once then lift your feet in the air, allowing the weight of your legs to push you under. Keep kicking as you submerge. Do not over estimate the depth you can dive or the time you can spend down. Learn your limits slowly and safely. Uncomfortable? Turn quickly and kick to the surface, breathe, rest, try it again.

Water pressure on the eardrums will make your ears ache in just a few feet of water; to alleviate the pain and adjust the pressure in your head, as you dive pinch your nose, close your mouth and "blow" to pop your ears. If pain, discomfort, dizziness or other distress continues, turn and kick to the top. Stay there for the duration of your swim.

Where are all the fish? The water near shore may be murky from fresh-water springs, lots of people wading or surf action; swim out a little until the water gets crystal clear…that's better. Although you will likely see large swarms of fish swimming about all over the bay, remember they live along the rocks and coral and not over sand, so that's where the most interesting stuff is. Check out cliffs, ledges, pockets and boulders. Look closer. You can get a cheap, disposable underwater camera for less than ten bucks at WalMart--it may be the best $10 you spend on your whole trip. Get two. Don't forget to take pictures of each other, too.

Before you get tired, before you feel your back getting sunburned, before you shoot the last picture, before the wind comes up or the surf builds, it's time to get out. Don't push it, the ocean plays for keeps and it never gets tired. Remember your plan; where's your sandy exit point? Swim toward it; keep swimming until you are in about the same depth of water where you put your fins on--it's easier to stand up from a floating position in about navel-deep water. Keep your eye on the ocean as you walk out onto the beach. Wasn't snorkeling amazing? Wait'll you see those pictures!

After getting out, trust me, you are going to want to rinse yourself off--the ocean salt is really irritating to your skin as you dry off. You also need to thoroughly rinse your gear--the salt attacks and destroys the rubber and plastic. If there are not showers or any way to rinse off where you are snorkeling, you should bring a jug of water (about one gallon per person for body, hair and gear will do it) to do this. No, no, you really, really will want to rinse off after, I promise.

Photo by Donald MacGowan
Humuele'ele at Honomalino Bay, Big Island, Hawaii: Photo by Donald MacGowan

Part III of this series will discuss snorkeling etiquette; Part IV will discuss snorkeling safety, Part IV will discuss the best places on the Big Island to go snorkeling and Part VI will discuss wilderness snorkeling.

To see a video covering many of these topics, go here. For more information on traveling to Hawaii in general, and beach activities on the Big Island in particular, visit www.tourguidehawaii.com and www.lovingthebigisland.wordpress.com. For information about the author, go here.

All media copyright 2009 by Donald B. MacGowan; all rights reserved.


Casino Bonus no Deposit